Learn Java Programming
13.0 Servlets
The following are some of the objectives of this module:
- Understand the evolution of web applications and why Servlets were invented
- The HTTP protocol
- Processing HTTP GET and POST on the servlet
- Saving state between HTTP requests using the HttpSession
- Protecting server resources – Basic Authentication
- Form based authentication
- Servlet redirects and forwards
We know that a web server serves web request. Servlets expand this functionality of a Java enabled web server. Servlets do the same thing that the web server does – it serves request to clients using the HTTP protocol.
Using servlets, it is possible to create dynamic content for a user – depending on the user’s input. Servlets thus make it possible to provide an interactive experience for the user.
To understand the power and evolution of Servlets, let us briefly look at the history of web applications:
History of web applications:
It all started with static web pages. The internet of those days were interlined documents, with static links to each other. Then users started complaining about the lack of interactivity. This gave birth to the CGI (Common Gateway Interface) scripts. These CGI scripts used to execute on the server and generate a response for the user, and thus paved the way for interactive user experiences.
CGI scripts were a huge success – but the major limitation was that for each user request, the server had to spawn a separate process.
This soon became a problem as processors machines could only support a finite number of processes at a time – this meant putting a cap on the number of concurrent requests that could be served at a time. Servers thus could not grow beyond a specific load – as the number of users kept growing, CGI scripts could not scale up to that number of users.
Another major limitation of CGI scripts was that since each request was run in a separate process, it could not access the server resources since the server was another separate process. (If you would recall our previous discussion, one process cannot access the memory or resources of another process)
Servlets were born to solve this problem.
Servlets are basically Java programs, that are thread-safe. Servlets thereby make it possible for multiple concurrent requests to access resources and serve dynamic content to the clients.
Servlets spawn multiple threads to serve each request, within the same process. That is how it is possible to service multiple concurrent requests of the same type. [Remember, that earlier, CGI programs used separate processes for each request]
The following are the advantages that the servlet technology inherently possesses:
- Since a Servlet is a Java program, it can harness the full power of the Java Core APIs like multi-threading, database connectivity etc.
- Servlets can also utilize the platform services of a J2EE container like Transactions, Messaging Services, JavaMail etc.
- Servlets can also maintain state in between HTTP requests – using cookies and session objects. Convenient classes in the Servlet specification enable us to achieve this.
That basically answers the question, why do we need Servlets. Servlets are indeed an important milestone in the evolution of Web applications.
Let us now take a quick look at the HTTP protocol:
The HTTP Protocol
The HTTP Protocol, standing for Hypertext Transfer Protocol, is a simple stateless protocol. A web client (which could be a web browser) , makes a request to the server, and the server responds with some data, and the transaction is done.
When the client sends a request, the first thing it specifies is a HTTP command called the method, that tells the server, what type of action it wants to be performed.
The first line of the request from the client, specifies the address of the document and the version of the HTTP protocol that the client is using:
GET /welcome.html HTTP/1.1
This request from the client tells the server that the client wants to GET the file under the application top root folder, called the welcome.html and that the client is using the HTTP protocol version 1.0
The HTTP request from the client has some important information for the server. This information is stored in the HTTP Header section. The important information from the HTTP header that is of use to the server are as follows:
User Agent:
The User Agent provides information to the server about the software on the client
User-Agent: Mozilla/4.0 (compatible; MSIE 6.0; Windows NT 5.1)?
Accept: The Accept header provides information about the media types that the client prefers to accept.
Accept: image/gif, image/jpeg, text/*, */*
Once the request from the client reaches the server, the server processes the request and sends a response to the client.
HTTP/1.0 200 OK
The first line of the response is the status line which specifies the version of the HTTP protocol the server is using, a status code, and a description of the status code:
A status code of 200 means the request was processed by the server successfully. A status code of 404 means the requested document was not found on the server
A status code of 500 generally means that the client request could not be processed by the server and the server returns an error response to the client.
The Server also sends the client more details like what software the server is running, and the content-type of the server’s response.
	Date: Saturday, 17-Nov-10 17:57:32 GMT
	Server: Tomcat Web Server/6.0
	Content-type: text/html
	Content-length: 1027
	Last-Modified: Monday, 17-Nov-10 17:57:32 GMT
Web applications
A web application, or a webapp, is generally a collection of servlets, Java server pages, HTML documents, images and everything that can be served as a content for a user request.
The folder directory structure of a typical web application is as shown below:
<webapp-name>
	|
	| ---- WEB-INF
	| 	|
	| 	|--- classes
	| 	|
	| 	|--- lib
	| 	|
	| 	|--- jsp
	| 	|
	| 	|
	| 	web.xml
	|
	index.html
Every web application, has to compulsorily have a folder called WEB-INF (note how the folder has been named with capitalization) – the application class files including the servlet files will be stored in the classes folder.
The libraries used by the application, like for example, the MySql JDBC connector, would be stored in the lib directory.
Java Server Pages (JSP) files, if any, would generally be stored in the jsp folder directory.
The index.html is the default page that is served, when the client does not request any particular document name. The index.html is also referred to as the welcome page.
The web.xml file
Every web application has a web.xml file. The web.xml is essentially the servlet mapping file – it serves to map request URLs to be served by a specific servlet. Basically the web.xml file defines the servlets in the web applications, and maps the urls that are to be served by a particular servlet.
The web.xml can also be defined as a deployment descriptor, that allows web application configuration information to be specified in a server independent manner, simplifying the deployment process.
Every application has to compulsorily have a web.xml
A sample web.xml is shown below:
Filename: web.xml
Path: <webappname>/WEB-INF/web.xml
<?xml version="1.0" encoding="UTF-8"?>
<!DOCTYPE web-app PUBLIC '-//Sun Microsystems, Inc.//DTD
Web Application 2.3//EN'
'http://java.sun.com/dtd/web-app_2_3.dtd'>

<web-app>

	<servlet>
		<servlet-name>greeting</servlet-name>
		<servlet-class>
			com.itseasytolearn.servlets.Welcome
		</servlet-class>
	</servlet>

	<servlet-mapping>
		<servlet-name>greeting</servlet-name>
		<url-pattern>/welcome.html</url-pattern>
	</servlet-mapping>

	<servlet-mapping>
		<servlet-name>greeting</servlet-name>
		<url-pattern>/welcome/*</url-pattern>
	</servlet-mapping>
</web-app>
In the above example, we register the servlet com.itseasytolearn.servlets.Welcome under the name greeting. The Java class [com.itseasytolearn.servlets.Welcome.class] needs to exist in the <webappname>/WEB-INF/classes/com/itseasytolearn/servlets directory.
The web.xml defines the URL mappings on the server for our web application.
Any URL that ends with welcome.html or contains the word welcome in the URL will be processes by the servlet class identified by the the name [greeting] – which maps to com.itseasytolearn.servlets.Welcome class.
Building web applications:
Earlier in the discussion, we saw the structure of a typical web application – now let us look at our setting up our development environment, for developing web applications.
The following folder structure is recommended:
	<project-name>
		|
		|_______ src
		|
		|_______ war
			|
			| _____ WEB-INF
			| 	|
			| 	|--- classes
			|	|
			| 	|--- lib
			|	|
			| 	|--- jsp
			|	|
			|	|
			| 	web.xml
			|	|
			|	|
			|	log4j.properties
			|
			|
			index.html
All the servlet classes with the package names as sub-folder heirarchy must be placed under the src folder.
The war folder defines the files and the structure that will be copied to the Tomcat web server
The WEB-INF folder has the sub-folders called classes, where the compiled classes would be placed. The lib folder contains the third-party libraries (for example JDBC Connector jar files) that will be required by the Java code executing in the Servlet classes.
The jsp folder contains the JSP files that are part of the web application – for now, we will focus only on servlets, and look at JSPs in the later section – do not worry if this folder is empty for now.
It is a good idea to use a logging framework like log4j to follow the code and debug on the server – any log4j.properties should be placed in the WEB-INF folder
The welcome file (generally by convention called as the index.html) must be available in the war folder.
The web.xml file under the WEB-INF folder contains the servlet definitions and URL mappings for this web aplication.
Make it a point to create the folder structure as given in this model for all your web application projects.
Let us look at a sample ANT build file for creating and deploying a web application:
Sample ANT build file:
The build.properties file is used to define the local environment settings. This file you will usually modifiy to suit your local environment
Filename: build.properties
Path: <Project Name root folder>
	project.name=servlets-1
	tomcat.home=D:/apache-tomcat-6.0.20
This file defines the local environment settings that are used in the build.xml – for example tomcat.home may vary from one system to another – I have it on my D: drive, you could have it on your C: drive – Also on a Linux operating system, the tomcat.home path is going to be different like say something like this
tomcat.home=usr/local/apache-tomcat-6.0.20
So the build.properties externalize those properties that can vary from system to system and platform to platform
Filename: build.xml
Path: <Project Name root folder>
<?xml version="1.0"?>
<project name="servlets-1" default="compile" basedir=".">

	<property file="build.properties" />
	<property name="src.dir" value="src"/>
	<property name="web.dir" value="war"/>
	<property name="lib.dir" value="${web.dir}/WEB-INF/lib"/>
	<property name="build.dir" value="${web.dir}/WEB-INF/classes"/>

	<property name="project.name" value="servlets-1"/>

	<property name="deploy.path"
		value= "${tomcat.home}/webapps/${project.name}" />

	    <path id="master-classpath">
		<fileset dir="${web.dir}/WEB-INF/lib">
		    <include name="*.jar"/>
		</fileset>
		<fileset dir="${tomcat.home}/lib">
		    <include name="servlet*.jar"/>
		</fileset>
		<pathelement path="${build.dir}"/>
	    </path>

	<patternset id="meta.files">
		<include name="**/*.xml"/>
		<include name="**/*.properties"/>
	</patternset>

	<target name="prepare">
		<mkdir dir="${build.dir}" />
	</target>

	<target name="clean" description="Remove all generated files">
		<delete dir="${build.dir}" />
	</target>


	<target name="compile" depends="prepare" >
		<javac destdir="${build.dir}" debug="true"
		optimize="false" failonerror="true">

		<src path="${src.dir}"/>
			<classpath refid="master-classpath"/>
		</javac>

		<!-- Copy over the mapping files -->
		<copy todir="${build.dir}">
			<fileset dir="${src.dir}">
				<patternset refid="meta.files"/>
			</fileset>
		</copy>
	</target>

	<target name="undeploy">
		<delete dir="${deploy.path}"/>
	</target>

	<target name="deploy" depends="compile">
		<copy todir="${tomcat.home}/webapps/${project.name}"
		preservelastmodified="true">

			<fileset dir="${web.dir}">
				<include name="**/*.*"/>
			</fileset>

		</copy>
	</target>
</project>
This ANT build file is very similar to the one that we saw during our discussion of ANT build files. The most notable difference is the deploy target.
Note we compile the Java classes making the destination folder as WEB-INF/classes folder – also all the JSP files and the web.xml files are defined inside the [war] folder – So deploying the application is now as simple as copying the entire contents of the war folder to the [tomcat.home/webapps/<project_name>] folder
If we need to undeploy the web-application from Tomcat, all we now have to do is the remove the webapps/<project-name> folder from TOMCAT HOME. ANT has certainly made life very easy for us.
Make sure you follow the development environment setup with the recommended folder structure and simply reuse the ANT file we saw above.
A Simple Servlet class:
Let us look at a simple Servlet class. We know that a Servlet is an extension of the Web Server (what this means is that your Servlet is a mini web server). Java allows us to create a servlet by extending the javax.servlet.http.HttpServlet class.
All we need to do is to implement the doGet() method, and voila we can now handle any GET request to our website.
Filename: Welcome.java
package com.itseasytolearn.servlets;

import java.io.*;

import javax.servlet.*;
import javax.servlet.http.*;

public class Welcome extends HttpServlet {

  public void doGet(HttpServletRequest req, HttpServletResponse res)
  throws ServletException, IOException {

	res.setContentType("text/html");
	PrintWriter out =  res.getWriter();

	out.println("<html>");
	out.println("<head><title>Welcome</title></head>");
	out.println("<body>");
	out.println("<p>Welcome to the world of servlets </p>");
	out.println("Its Easy To Learn Servlets and is also fun!");
	out.println("</body>");
	out.println("</html>");
  }

}
Whenever we get a GET request to the URL that would be mapped to this servlet, [which is what the web.xml will be doing] we print the response as:
Welcome to the world of servlets.
Its Easy To Learn Servlets and is also fun!
Also note, the doGet() method takes a HttpServletRequest and a HttpServletResponse object as parameters.
We now have full access to the request values that were set by the user request, and we can now form our own response to the user who made the request. Servlets thus, let us achieve dynamism in our application. The web application now has become interactive, giving a response depending on the user’s request.
Reading data from the request and setting the response:
Let us see an example of how to read data from a request, and set a customized response to the user
Filename: CustomHello.java
Path: servlets-2/src/com/itseasytolearn/servlets
package com.itseasytolearn.servlets;

import java.io.*;
import javax.servlet.*;
import javax.servlet.http.*;

public class CustomHello extends HttpServlet {

  public void doGet(HttpServletRequest req, HttpServletResponse res)
			       throws ServletException, IOException {

    res.setContentType("text/html");
    PrintWriter out = res.getWriter();

    String name = req.getParameter("name");
    out.println("<html>");
    out.println("<head><title>Welcome, " + name  + " </title></head>");
    out.println("<body>");
    out.println("Hello, " + name + " Welcome - ItsEasyToLearn Servlets!");
    out.println("</body></html>");
  }


  public void doPost(HttpServletRequest req, HttpServletResponse res)
			       throws ServletException, IOException {

	doGet(req, res);

  }
}
Note how this class supports both GET and POST thru the doGet() and doPost() methods respectively. It is possible to get data from the request from the getParameter() method.
Assuming we had a HTML input element of with the name as “name”, we can get the value entered for that HTML input element using the getParameter() method.
String name = req.getParameter("name");
HTML form to capture user input
The following is the corresponding HTML form to capture user’s input:
Filename: form.html
Path: servlets-2/war
<html>
<head><title>POSTing to a Servlet</title></head>
<body>
	<form method="post" action="/servlets-2/welcome">
		<p>Hey! Whats your name? </p>
		<input type="text" name="name">
		<br>
		<input type="submit">
	</form>
</body>
</html>
If you would note, the form tag has a POST method which will post it to an action, in this case its /servlets-2/welcome
Filename: web.xml
Path: servlets-2/war/WEB-INF/
<?xml version="1.0" encoding="UTF-8"?>

<!DOCTYPE web-app
	PUBLIC "-//Sun Microsystems, Inc.//DTD Web Application 2.3//EN"
	"http://java.sun.com/dtd/web-app_2_3.dtd">

<web-app>

	<servlet>
		<servlet-name>customgreeting</servlet-name>
		<servlet-class>
			com.itseasytolearn.servlets.CustomHello
		</servlet-class>
	</servlet>

	<servlet-mapping>
		<servlet-name>customgreeting</servlet-name>
		<url-pattern>/welcome</url-pattern>
	</servlet-mapping>

</web-app>
When the form.html, posts the user entered data to the url given by the action tag:
<form method="post" action="/servlets-2/welcome">
	. . .
</form>
the URL mapping in the web.xml
<web-app>
	<servlet>
		<servlet-name>customgreeting</servlet-name>
		<servlet-class>
			com.itseasytolearn.servlets.CustomHello
		</servlet-class>
	</servlet>

	<servlet-mapping>
		<servlet-name>customgreeting</servlet-name>
		<url-pattern>/welcome</url-pattern>
	</servlet-mapping>
</web-app>
directs the control to the servlet given by the name customgreeting, which is mapped to the com.itseasytolearn.servlets.CustomHello class.
In the CustomHello class, we get the value from the request using the getParameter() method. We need to know the name of the input element in the html form from where the the client posted data to this servlet.
String name = req.getParameter("name");
Selecting multiple values from the request:
Also if the user had a provision to select multiple values from the HTML for, then at the server end, we can get those values using the getParameterValues() method.
The getParameterValues() method always returns a String array.
String[] favouriteColors = req.getParameterValues( “hobbies” );
Filename: simpleform.html
Path: servlets-3/war
<html>
<body>

<form method="post" action="/servlets-3/processform">
	. . .

	<b> Select your hobby </b>
		<select name="hobby" multiple = "true" size="1">
			<option name="books">books</option>
			<option name="music">music</option>
			<option name="movies">movies</option>
		</select>
	<br>

	<br>

	. . .

	<input type="submit">
</form>
</body>
</html>
Filename: Processform.java
Path: servlets-3/src/com/itseaytolearn/servlets
public class ProcessForm extends HttpServlet {

	public void doPost(HttpServletRequest req, HttpServletResponse res)
				throws ServletException, IOException {
	. . .

		String[] hobbies = req.getParameterValues("hobby");
	. . .


	}
Filename: web.xml
Path: servlets-3/war/WEB-INF
<web-app>

	<servlet>
		<servlet-name>process</servlet-name>
		<servlet-class>com.itseasytolearn.servlets.ProcessForm</servlet-class>
	</servlet>

	<servlet-mapping>
		<servlet-name>process</servlet-name>
		<url-pattern>/processform</url-pattern>
	</servlet-mapping>

</web-app>
Saving state:
We know that the HTTP protocol is a stateless protocol. But there are times when we need to have a conversation that will span across user interactions. A typical example is a shopping cart. Here a user generally makes multiple interactions with the server to finally decide on the number of items. Online shopping applications, generally have a shopping cart where the user can store the choices until they are finally done, and this happens over multiple request-response interaction of the user with the web server.
In such cases as these, the user interaction, extend well beyond just one page – and it is necessary to store the state between page invocations.
How do we store state between page invocations?
The Servlet API provides the Session tracking API in order to store session state between invocations.
A Servlet uses its request object’s getSession() method to retrieve the current HttpSession object:
public HttpSession HttpServletRequest.getSession(boolean create);
This method returns the current session associated with the user making the request. If the user has no current valid sesssion, this method creates one if “create” is true, or returns null if “create” is false. Please note there is only one session associated with a user!
To add data to a HttpSession object, use the setAttribute() method
public void HttpSession.setAttribute(String name, Object o);
To retrieve an object from the session, use the getAttribute() method
public Object HttpSession.getAttribute(String name);
The invalidate() method is used to cause the session to become invalidated.
public void HttpSession.invalidate();
Let us define a simple shopping cart application – here comes the User Interface:
Filename: shoppingcart.html
Path: servlets-4/war
<html>
<head>
<title>Welcome to the online shopping portal</title>
<script language="JavaScript" type="text/javascript">
	function add2ShoppingCart() {
		document.forms[0].action = '/servlets-4/addmoreitems' ;
		document.forms[0].submit();
	}

	function checkOut() {
		document.forms[0].action = '/servlets-4/finish' ;
		document.forms[0].submit();
	}

	function clearSelection() {
		document.forms[0].action
		 	= '/servlets-4/addmoreitems?clearSelection=true' ;

		document.forms[0].submit();
	}


</script>
</head>
<body>

<form method="post" action="/servlets-4/checkout">

	<table border=0>
	<tr>
		<td colspan=2><b>Please enter your details </b></td>
	</tr>
	<tr>
		<td colspan=2> </td>
	</tr>
	<tr>
		<td><b> Enter you name </b> </td>
		<td><input type="text" name="name"></td>
	</tr>
	<tr>
		<td><b> Shipping address </b> </td>
		<td>
			<textarea name="address" rows=5 cols=20>
			</textarea>
		</td>

	</tr>
	<tr>
		<td><b> Enter your credit card number </b> </td>
		<td><input type="text" name="creditcard"></td>
	</tr>
	<tr>
		<td><b> Select items </b> </td>
		<td>
			<select name="items" multiple="multiple" size=3>
			<option name="java1">
				Java Complete Reference - Herbert Schildt
			</option>
			<option name="java2">
				J2EE without EJB - Rod Johnson
			</option>
			<option name="general1">
				Think and Grow Rich - Napolean Hill
			</option>
			<option name="general2">
				Rich dad Poor dad - Robert Kiyosaki
			</option>
		</select>
		</td>
	</tr>
	<tr>
		<td colspan=2> </td>
	</tr>
	</table>
	<table>
	<tr>
		<td>
			<input type="button" value="Add to shopping cart"
			onclick="add2ShoppingCart()">
		</td>
		<td>
			<input type="button" value="Check out"
			onclick="checkOut()">
		</td>
		<td>
			<input type="button" value="Clear selection"
			onclick="clearSelection()">
		</td>
	</tr>
	<tr>
		<td colspan=3> </td>
	</tr>

	</table>
</form>
</body>
</html>
Here is our actual merchandise – this is what we are selling to the users now:
<form method="post" action="/servlets-4/checkout">
	. . .

	<select name="items" multiple="multiple" size=3>

		<option name="java1">
			Java Complete Reference - Herbert Schildt
		</option>

		<option name="java2">
			Java Servlet Programming - Jason Hunter
		</option>

		<option name="general1">
			Think and Grow Rich - Napolean Hill
		</option>

		<option name="general2">
			Rich dad Poor dad - Robert Kiyosaki
		</option>
	</select>

	. . .

</form>
Also notice that we have three different buttons or User Actions – our previous examples had only on submit button <input type=”submit’ />
This is the first time we have a deviation with three submit buttons – A form tag can have only ONE submit type. But since we have three different options
- Continue shopping
- Check Out
- Clear selection and start again
we are forced to have three normal buttons.
<input type="button" value="Add to shopping cart"
					onclick="add2ShoppingCart()">

<input type="button" value="Check out" onclick="checkOut()">

<input type="button" value="Clear selection" onclick="clearSelection()">
What these buttons do is to Submit the form to a specific URL, depending on the type of the action. To make this distinction on the type of action the user wants, we will make use of some simple javascript. The onclick attribute on the button points to a javascript function defined within the html page:
Note that javascript functions are defined within <script></script> tags in the header area:
<html>
	<header>
		<script>
		. . .
		</script>
	</header>
	<body>
	. . .
	</body>
</html>
Note that here we have 3 different operations that can be performed by a user on this web page.
The use makes her preference, and can proceed to “Check Out” or the user can decide to “Continue” shopping or to “Cancel” all the selections done so far. So for this, we have 3 buttons above for each function.
And we change the POST ACTION URL based on the selected button using a javascript function.
<head>
<title>Welcome to the online shopping portal</title>
<script language="JavaScript" type="text/javascript">

	function add2ShoppingCart() {
		document.forms[0].action = '/servlets-4/addmoreitems' ;
		document.forms[0].submit();
	}

	function checkOut() {
		document.forms[0].action = '/servlets-4/finish' ;
		document.forms[0].submit();
	}

	function clearSelection() {
		document.forms[0].action =
			'/servlets-4/addmoreitems?clearSelection=true' ;

		document.forms[0].submit();
	}
</script>
</head>
Looking at the web.xml mapping for our shopping cart web application, it is given as follows:
<web-app>

	<servlet>
		<servlet-name>addItems</servlet-name>
		<servlet-class>
			com.itseasytolearn.servlets.AddItems
		</servlet-class>
	</servlet>

	<servlet>
		<servlet-name>checkOut</servlet-name>
		<servlet-class>
			com.itseasytolearn.servlets.CheckOutProcess
		</servlet-class>
	</servlet>


	<servlet-mapping>
		<servlet-name>checkOut</servlet-name>
		<url-pattern>/finish</url-pattern>
	</servlet-mapping>

	<servlet-mapping>
		<servlet-name>addItems</servlet-name>
		<url-pattern>/addmoreitems</url-pattern>
	</servlet-mapping>

</web-app>
We have just two servlet classes AddItems and CheckOutProcess mapped to the URLs /addmoreitems and /finish
Let us look at the class AddItems.java to see how we manage to add and store user choice across invocations.
Filename: AddItems.java
Path: servlets-4/src/com/itseasytolearn/servlets
package com.itseasytolearn.servlets;

import java.io.*;

import java.util.List;
import java.util.ArrayList;
import javax.servlet.*;
import javax.servlet.http.*;

public class AddItems extends HttpServlet {

  public void doPost(HttpServletRequest req, HttpServletResponse res)
  throws ServletException, IOException {


	String name = req.getParameter("name");
	String address = req.getParameter("address");
	String creditcard = req.getParameter("creditcard");

	String clearSelection = req.getParameter("clearSelection");
	boolean newSelection = false;

	HttpSession session = req.getSession();

	if (clearSelection != null && "true".equals(clearSelection)) {
		session.invalidate();
		session = req.getSession();
		newSelection = true;
	}

	String[] items = req.getParameterValues("items");


	List existingItems = new ArrayList();
	existingItems = (List) session.getAttribute("cart.items");


	res.setContentType("text/html");
	PrintWriter out =  res.getWriter();

	out.println("<html>");
	out.println("<head><title>Welcome "
		+ name + "!" + "</title></head>");

	out.println("<body>");
	out.println("Welcome " + name + " !");
	out.println("<br>");
	out.println("<br>");
	out.println("<br>");
	out.println("Your shipping address is " + address);

	out.println("<br>");
	out.println("<br>");
	out.println("<br>");


	if (existingItems != null) {

		out.println("You had selected the following items: ");

		for (int i=0; i < existingItems.size(); i++ ) {
			out.println("<br>");
			out.println((String) existingItems.get(i));

		}
	}

	out.println("<br>");
	out.println("<br>");

	out.println("You have now selected the following items: ");

	if (items != null) {
		for (int i=0; i < items.length; i++ ) {
			out.println("<br>");
			out.println(items[i]);

			if (existingItems == null) existingItems = new ArrayList();

			existingItems.add(items[i]);

		}
	}


	session.setAttribute("cart.items", existingItems);

	session.setAttribute("name", name);
	session.setAttribute("address", address);
	session.setAttribute("creditcard", creditcard);


	out.println("<br>");
	out.println("<br>");

	if (newSelection) {

		out.println(" If you want to do it over again ,<a href=\""
		+ res.encodeURL("/servlets-4/shoppingcart.html")
		+ "\"> click here! </a>");

	} else {

		out.println(" If you want to add more items ,<a href=\""
		 + res.encodeURL("/servlets-4/shoppingcart.html")
		 + "\"> click here! </a>");
	}

	out.println("</body>");
	out.println("</html>");
  }

}
If you would look at the add2ShoppingCart() and clearSelection() javascript functions
	function add2ShoppingCart() {
		document.forms[0].action = '/servlets-4/addmoreitems' ;
		document.forms[0].submit();
	}

	function clearSelection() {
		document.forms[0].action
			= '/servlets-4/addmoreitems?clearSelection=true' ;

		document.forms[0].submit();
	}
they submit to the AddItems servlet. In this servlet, the user information like name, address and the credit card details are read.
If the clearSelection request parameter is set to true, then the servlet code just invalidates the session and create a new session object – it also sets a flag to mark that the older items if any have been selected, have been discarded.
If the clearSelection request parameter is EMPTY or not set to true, then it means the user has added items to the shopping cart – either for the first time, or made more selection.
We try to get the object from the session looking for the key [cart.items] – if it is null, then it means the user is adding items for the very first time. We get the selected items using the
String[] items = req.getParameterValues("items");
method, add them to an ArrayList and set the ArrayList as the value in the HttpSession with the key cart.items
If cart.items already exist in the session, it means that the user has already made some selection and is adding more items to the cart. Here we fetch the existing items that we had already stored, and add the new values that the user selected, and put them back into the session.
Let us now look at the Checkout process!
Filename: CheckOutProcess.java
Path: servlets-4/src/com/itseasytolearn/servlets
package com.itseasytolearn.servlets;

import java.io.*;

import java.util.List;
import java.util.ArrayList;
import javax.servlet.*;
import javax.servlet.http.*;

public class CheckOutProcess extends HttpServlet {

  public void doPost(HttpServletRequest req, HttpServletResponse res)
					throws ServletException, IOException {

	HttpSession session = req.getSession();

	String name = req.getParameter("name");
	String address = req.getParameter("address");
	String creditCard = req.getParameter("creditcard");

	String[] items = req.getParameterValues("items");

	List selectedItems = (List) session.getAttribute("cart.items");

	res.setContentType("text/html");
	PrintWriter out =  res.getWriter();

	out.println("<html>");
	out.println("<head><title>Welcome "
				+ name + "!" + "</title></head>");

	out.println("<body>");
	out.println("Hello " + name + " !");
	out.println("<br>");
	out.println("<br>");
	out.println("<br>");

	out.println("You have selected the following items: ");
	out.println("<br>");
	out.println("<br>");
	if (selectedItems != null) {
		for (int i=0; i < selectedItems.size(); i++ ) {
			out.println("<br>");
			out.println((String) selectedItems.get(i));

		}
	}

	if (items != null) {
		for (int i=0; i < items.length; i++ ) {
			out.println("<br>");
			out.println(items[i]);
		}
	}

	out.println("Your shipping address is " + address);

	out.println("<br>");
	out.println("<br>");
	out.println("<br>");
	out.println("Your credit card number is " + creditCard);

	out.println("<br>");
	out.println("<br>");
	out.println("<br>");
	out.println("Thank you for shopping - Have a  nice day!");


  }
}
The javascript function called checkout() actually posts the data to /servlets-4/finish URl
function checkOut() {
	document.forms[0].action = '/servlets-4/finish' ;
	document.forms[0].submit();
}
Here in the CheckoutProcess servlet, we fetch the selected items of the shopping cart which we stored in the HttpSession object and print the values to the user.
This example serves to explain how data is persisted across invocations in HTTP requests, though HTTP being a stateless protocol.
Servlet Security
We know that a web application serves our resources (web pages are resources) – and some of the resources are exclusive to only one category of people.
For example, let us say that we had salary details view in our web application, that would list the salaries of all the people in the organization. Now we do not want everybody to access this information – we want only managers to access this data.
Servlets make it possible and easy for us to protect a resource. Resource protection is function of two aspects:
- Roles
- Resources
Basically, we need to define which roles would define which resources?
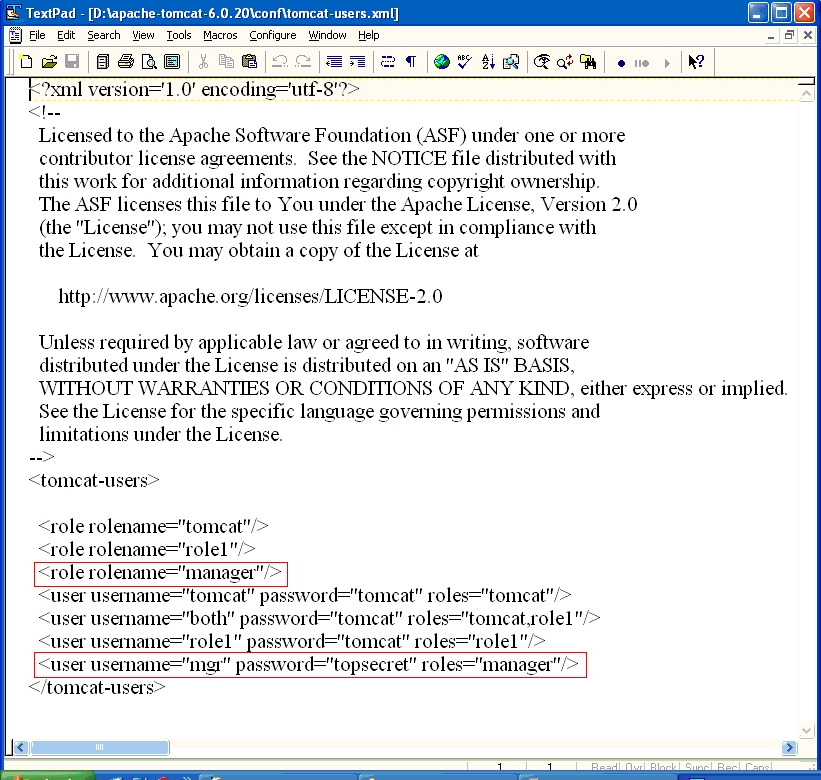
BASIC Authentication
The simplest type of authentication is the BASIC authentication. In the BASIC authentication, we use the tomcat-users.xml file in the $TOMCAT_HOME/conf folder to define the roles and the users with the password
Filename: tomcat-users.xml
Path: $TOMCAT_HOME/conf
<?xml version='1.0' encoding='utf-8'?>
<!--
  Licensed to the Apache Software Foundation (ASF) under one or more
  contributor license agreements.  See the NOTICE file distributed with
  this work for additional information regarding copyright ownership.
  The ASF licenses this file to You under the Apache License, Version 2.0
  (the "License"); you may not use this file except in compliance with
  the License.  You may obtain a copy of the License at

      http://www.apache.org/licenses/LICENSE-2.0

  Unless required by applicable law or agreed to in writing, software
  distributed under the License is distributed on an "AS IS" BASIS,
  WITHOUT WARRANTIES OR CONDITIONS OF ANY KIND, either express or implied.
  See the License for the specific language governing permissions and
  limitations under the License.
-->
<tomcat-users>

  <role rolename="tomcat"/>
  <role rolename="role1"/>

  <role rolename="manager"/>

  <user username="tomcat" password="tomcat" roles="tomcat"/>
  <user username="both" password="tomcat" roles="tomcat,role1"/>
  <user username="role1" password="tomcat" roles="role1"/>

  <user username="mgr" password="topsecret" roles="manager"/>
</tomcat-users>
Note: $TOMCAT_HOME refers to where I have installed Tomcat on my computer. For me it is D:\apache-tomcat-6.20. If you have installed the same Tomcat version as myself on your C: drive, then your $TOMCAT_HOME will refer to C:\apache-tomcat-6.20
We have just added one role called manager and a user called mgr belonging to the manager role.
	<role rolename="manager"/>

	<user username="mgr" password="topsecret" roles="manager"/>
We protect a URL by placing a constraint on the web.xml. Following is the constraint we have placed in the web.xml to protect a resource. The following is the xml we need to add to our existing web.xml to protect a resource and to identify the authentication mechanism to grant access to the resource.
<security-constraint>
	<web-resource-collection>
		<web-resource-name>AgeProtector</web-resource-name>
		<url-pattern>/whatsyourage</url-pattern>
		<http-method>GET</http-method>
		<http-method>POST</http-method>
	</web-resource-collection>
	<auth-constraint>
		<role-name>manager</role-name>
	</auth-constraint>
</security-constraint>

<login-config>
	<auth-method>BASIC</auth-method>
	<realm-name>Tell me who you are to know my age!</realm-name>
</login-config>
We have in effect, protected the url pattern /whatsyourage for GET and POST requests and have authorized access only to the role given by the name of manager.
We have also specified that the authentication method is BASIC and the message shown to the user asking for username and password, will contain the text “Tell me who you are to know my age!”
The complete web.xml file is given below:
Filename: web.xml
Path: servlets-5/war/WEB-INF
<?xml version="1.0" encoding="ISO-8859-1"?>

<!DOCTYPE web-app
    PUBLIC "-//Sun Microsystems, Inc.//DTD Web Application 2.2//EN"
    "http://java.sun.com/j2ee/dtds/web-app_2_2.dtd">

<web-app>
    <servlet>
	<servlet-name>birthdayserver</servlet-name>
	<servlet-class>
		com.itseasytolearn.servlets.security.BirthdayServer
	</servlet-class>
    </servlet>

	<servlet-mapping>
		<servlet-name>birthdayserver</servlet-name>
		<url-pattern>/whatsyourage</url-pattern>
	</servlet-mapping>

	<security-constraint>
		<web-resource-collection>
			<web-resource-name>AgeProtector</web-resource-name>
			<url-pattern>/whatsyourage</url-pattern>
			<http-method>GET</http-method>
			<http-method>POST</http-method>
		</web-resource-collection>
		<auth-constraint>
			<role-name>manager</role-name>
		</auth-constraint>
	</security-constraint>

	<login-config>
		<auth-method>BASIC</auth-method>
		<realm-name>Tell me who you are to know my age!</realm-name>
	</login-config>

	<security-role>
		<role-name>manager</role-name>
	</security-role>
</web-app>
Let us build and deploy this application using the ANT build file. Change the build.properties file in the servlets-5 folder to point to your tomcat home directory, and run the ANT targets clean, compile, undeploy and deploy in the same order.
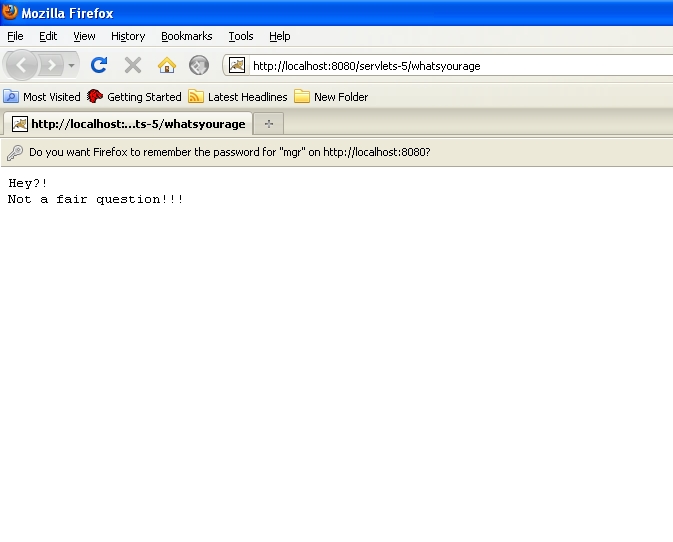
Now start Tomcat, and try to access the URL http://localhost:8080/servlets-5/whatsyourage
Tomcat will challenge you with a message box that will ask you to enter your user name and password – Unless you enter a valid username and password, you will not be able to get through (And if you have modified your tomcat-users.xml just like how it is shown above, then the valid username and password are mgr and topsecret)
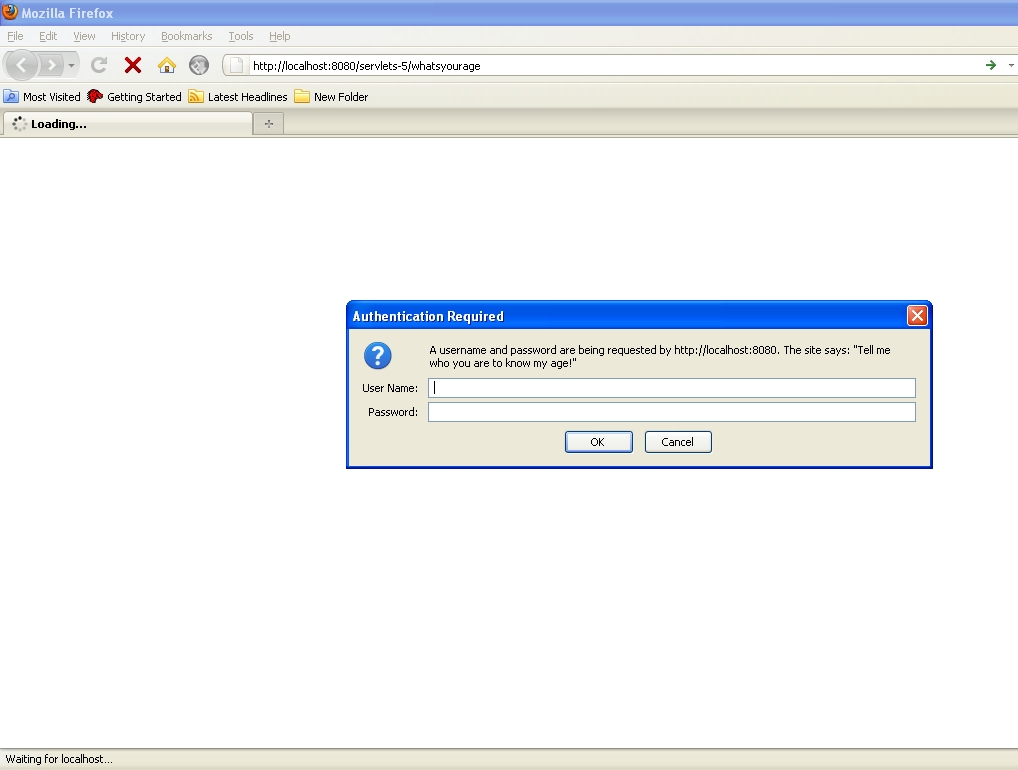
Whenever the URL pattern, ending with /whatsyourage is requested, the web server responds with a authentication mechanism asking the user for the username and password.
The values are checked with the values defined in tomcat-users.xml file, and the role definition for that user is fetched from the same file and decision whether to allow access or deny access is made with the above information.
Basic authentication transmits the username and password as clear text – so it is something you should think about if you are really concerned with security.
Form based authentication:
When challenging a user to present their credentials, Basic authentication does not give us present to the user a fancy login page with your company logo and a host of other information.
In form-based authentication, we can use a html page to get the login information and an error page to report any mismatch in credentials.
As in the BASIC authentication, in FORM based authentication, the constraint is defined the same way:
<security-constraint>
	<web-resource-collection>
		<web-resource-name>AgeProtector</web-resource-name>
		<url-pattern>/whatsyourage</url-pattern>
		<http-method>GET</http-method>
		<http-method>POST</http-method>
	</web-resource-collection>
	<auth-constraint>
		<role-name>manager</role-name>
	</auth-constraint>
</security-constraint>
The only difference between the BASIC authentication scheme and the FORM BASED authentication, is the login-config element in the web.xml
<login-config>
	<auth-method>FORM</auth-method>
	<form-login-config>
		<form-login-page>/loginpage.html</form-login-page>
		<form-error-page>/errorpage.html</form-error-page>
	</form-login-config>
</login-config>
Here we specify the form-login-page to be the html page loginpage.html
This page is a special page where the form tag has to post to the servlet j_security_servlet – and the username and password input html must be j_username and j_password respectively.
	<form method=post action=j_security_check>

		<input type=text name="j_username" />

		<input type="text" value = "j_password" />

	</form>
This convention must be compulsorily followed. Given below is the full listing of the loginpage.html
Filename: loginpage.html
Path: servlets-6/war/loginpage.html
<html>
<title>Login - Please enter your credentials </title>
<body>
<form method=post action=j_security_check>

<table border=0>
	<tr>
	<td colspan=2>
	Please enter your name and password to log in.
	</td>
	</tr>

	<tr>
		<td>
		<b>Name:</b>
		</td>
		<td>
		<input type=text name="j_username" value="">
		</td>
	</tr>

	<tr>
		<td>
		<b>Password:</b>
		</td>
		<td>
		<input type=password name="j_password" value="">
		</td>
	</tr>

	<tr>
		<td colspan=2>
		<input type=submit value="Login">
		</td>
	</tr>
</table>
</form>
</body>
</html>
The servlet j_security_servlet is a special servlet, that looks for the username in the request parameter j_username and the password in the request parameter j_password. It then looks up the tomcat-users.xml to validate the user and grant access to the resource as defined in the security-constraint element of the web.xml
The advantage of the FORM authentication, is that it allows us to have a well defined login page – and not just the dialog that is shown when we use BASIC authentication.
Form based custom authentication
Fetching user authentication information from the tomcat-users.xml file is not always a good idea, for obvious reasons. We want to make our passwords more secure. Most customers are happy to store their username and password in the database.
To keep passwords more secure, we will use a hybrid approach – form based authentication but with custom authentication.
To keep the discussion simple, let us assume we have a database table called ADMIN containing the usernames and password and another table called ROLES defining the roles in the system. – Each row in the admin table will represent a user and define a role for that user
Sample schema file is give below:
DROP DATABASE IF EXISTS STUDSERVLETDB;
CREATE DATABASE STUDSERVLETDB;
USE STUDSERVLETDB;

create table ROLE(
	ID bigint not null auto_increment primary key,
	NAME varchar(100) not null
);

INSERT INTO ROLE(NAME) values('ROLE_MGR');
INSERT INTO ROLE(NAME) values('ROLE_USER');

create table ADMIN
(
	ID bigint not null auto_increment primary key,
	USER_NAME varchar(50) not null,
	PASSWORD text not null,
	ENABLED boolean default true,
	ROLE_ID bigint not null,
	FOREIGN KEY (ROLE_ID) references ROLE(ID)
);


INSERT into ADMIN(USER_NAME, PASSWORD, ROLE_ID) values('admin','topsecret',1);
INSERT into ADMIN(USER_NAME, PASSWORD, ROLE_ID) values('guest','readonly',2);
Here we have two roles, ROLE_ADMIN and ROLE_USER. Next we create two users, admin and guest and assign them the roles ROLE_MGR and ROLE_USER respectively.
Make sure we also create a DB user with rights to the STUDSERVLETDB using the following command in the schema.sql
GRANT ALL ON STUDSERVLETDB.* TO 'learner'@'localhost' IDENTIFIED BY 'se3ret';
Now let us modify the loginpage.html to post to our servlet, instead of j_security_servlet
Filename: loginpage.html
Path: servlets-7/war
<html>
<title>Login - Please enter your credentials </title>
<body>
<form method=post action="/servlets-7/logincontroller">

	<table border=0>
		<tr>
			<td colspan=2>
			Please enter your name and password to log in.
			</td>
		</tr>

		<tr>
			<td><b>Name:</b>
			</td>
			<td>
			<input type=text name="username" value="">
			</td>
		</tr>

		<tr>
			<td>
				<b>Password:</b>
			</td>
			<td>
			<input type=password name="password" value="">
			</td>
		</tr>

		<tr>
			<td colspan=2>
			<input type=submit value="Login">
			</td>
		</tr>
	</table>
</form>
</body>
</html>
We then modify the web.xml and add a new servlet definition and mapping:
<servlet>
	<servlet-name>loginControllerServlet</servlet-name>
	<servlet-class>
		com.itseasytolearn.servlets.security.LoginController
	</servlet-class>
</servlet>


<servlet-mapping>
	<servlet-name>loginControllerServlet</servlet-name>
	<url-pattern>/logincontroller</url-pattern>
</servlet-mapping>
The loginpage.html will now post to the LoginController in the com.itseasytolearn.servlets.security package.
Filename: web.xml
Path: servlets-7/war/WEB-INF
<?xml version="1.0" encoding="UTF-8"?>

<!DOCTYPE web-app
    PUBLIC "-//Sun Microsystems, Inc.//DTD Web Application 2.2//EN"
    "http://java.sun.com/j2ee/dtds/web-app_2_2.dtd">

<web-app>
	<servlet>
	<servlet-name>birthdayserver</servlet-name>
	<servlet-class>
		com.itseasytolearn.servlets.security.BirthdayServer
	</servlet-class>
	</servlet>

	<servlet>
	<servlet-name>loginControllerServlet</servlet-name>
	<servlet-class>
		com.itseasytolearn.servlets.security.LoginController
	</servlet-class>
	</servlet>

	<servlet-mapping>
		<servlet-name>birthdayserver</servlet-name>
		<url-pattern>/whatsyourage</url-pattern>
	</servlet-mapping>

	<servlet-mapping>
		<servlet-name>birthdayserver</servlet-name>
		<url-pattern>/oktotellmyage</url-pattern>
	</servlet-mapping>


	<servlet-mapping>
		<servlet-name>loginControllerServlet</servlet-name>
		<url-pattern>/logincontroller</url-pattern>
	</servlet-mapping>

	<security-constraint>
		<web-resource-collection>
			<web-resource-name>AgeProtector</web-resource-name>
			<url-pattern>/whatsyourage</url-pattern>
			<http-method>GET</http-method>
			<http-method>POST</http-method>
		</web-resource-collection>
		<auth-constraint>
			<role-name>manager</role-name>
		</auth-constraint>
	</security-constraint>

	<login-config>
		<auth-method>FORM</auth-method>
		<form-login-config>
			<form-login-page>/loginpage.html</form-login-page>
			<form-error-page>/errorpage.html</form-error-page>
		</form-login-config>
	</login-config>

</web-app>
Now let us look at the LoginController class in detail.
Filename: LoginController.java
Path: servlets-7/src/com/itseasytolearn/servlets/security
package com.itseasytolearn.servlets.security;

import java.io.*;
import java.util.*;
import javax.servlet.*;
import javax.servlet.http.*;

import java.sql.Connection;
import java.sql.DriverManager;
import java.sql.PreparedStatement;
import java.sql.ResultSet;

public class LoginController extends HttpServlet {

  public void doPost(HttpServletRequest req, HttpServletResponse res)
  throws ServletException, IOException {

	res.setContentType("text/html");
	PrintWriter out = res.getWriter();

	String username = req.getParameter("username");
	String password = req.getParameter("password");

	String roleName = authenticateUser(username, password);

	if (roleName == null || "Guest".equalsIgnoreCase(roleName)) {
		out.println("<html><head>
			<title>Error : Access Denied</title>
		</head>");

		out.println("<body>
			Your credentials not  invalid at the server ");

		out.println("Please
		  <a href=\"/servlets-7/loginpage.html\">try again</a>");

		out.println("</body></html>");
	}
	else {

		HttpSession session = req.getSession();
		session.setAttribute("user.name", username);
		session.setAttribute("user.role", roleName);

	try {

		res.sendRedirect("/servlets-7/oktotellmyage");
		return;
	}
	catch (Exception e) {
		e.printStackTrace();
	}

		// Couldn't redirect to the target. Redirect to the site's home page.
		res.sendRedirect("/servlet-7");
	}
  }


  protected String authenticateUser(String username, String password) {

	. . .

  }

}
The doPost() method checks to see if the username and the password sent in the HTTP requested POSTed from the loginpage.html are valid by calling the method authenticateUser() method passing in the user entered values in the html page for the username and the password text fields.
The authenticateUser() method returns the Role name – If the username and password do not match, then the authenticateUser() method returns the role as Guest.
If the role is Guest, we do not let the user access the confidential page – and show a page with the response as “Access Denied” – If a valid user, then the request is directed to the protected resource URL /servlets-7/oktotellmyage
The username and the role is also stored in the session with the key as user.name and user.role
	session.setAttribute("user.name", username);
	session.setAttribute("user.role", roleName);
Let us look at how we implement the authenticateUser() method to fetch the values and validate the user against the database.
protected String authenticateUser(String username, String password) {

	Connection conn = null;
	PreparedStatement ps = null;
	ResultSet rs = null;

	String roleName = null;

	try {

		Class.forName("org.gjt.mm.mysql.Driver");

		conn = DriverManager.getConnection(
			  "jdbc:mysql://localhost:3306/STUDSERVLETDB",
			  "learner", "se3ret");

		String sqlQuery =
			"select r.name  from role r, users u where "
			+ "  u.user_name=? and u.password=?";

		ps = conn.prepareStatement(sqlQuery);

		ps.setString(1, username);
		ps.setString(2, password);

		rs = ps.executeQuery();

		while (rs.next()) {
			roleName = rs.getString("name");
			if (roleName == null || "".equals(roleName) )
			roleName =  "Guest";
		}
	} catch (Exception e) {
		e.printStackTrace();
	} finally {
	  try { if (rs != null) rs.close(); } catch (Exception e) { rs = null; }
	  try {if (ps != null) ps.close(); } catch (Exception e) { ps = null; }
	  try {if (conn != null)conn.close();}catch(Exception e){conn = null;}
	}

	return roleName;
}
This method is straight-forward. It creates a Connection object, my passing in the Connection String as jdbc:mysql://localhost:3306/STUDSERVLETDB which specifies the Protocol:Database://servername:host/database
Then the query select r.name from role r, users u where u.user_name=? and u.password=? is prepared, and the username and password that are specified by the user are set in the query parameters.
The query is executed, and the resultset is checked to get the String [name] from the [Role] table – If the [name] is not null, it means the username and password exist in the database and the user is a valid user – Every other user, we treat as a Guest user (If the query return null, we set the role as Guest) – this role name is then returned to the calling method, which is the doPost(), which makes some decisions on whether to show the page or not depending on the role name.
IMPORTANT note:
Do not forget to add the mysql JDBC Connnector jar to the WEB-INF/lib folder. The web server will use this JDBC drivers to make the JDBC connection.
The RequestDispatcher Interface:
Servlets can share control of the request. It is possible for one servlet to do some processing of the request and pass it to another servlet for further processing. This transfer of requests is done using the RequestDispatcher.
The RequestDispatcher is implemented by the web server – we can get a reference to RequestDispatcher interface in two ways
	ServletContext.getRequestDispatcher(String resourceURL);
	ServletRequest.getRequestDispatcher(String resourceURL);
for example:
	RequestDispatcher rd = request.getRequestDispatcher("pathToServlet");
	rd.forward(request, response);
The RequestDispacther inteface contains following two methods :
1. The forward() method
forward(ServletRequest request, ServletResponse response)
Forwards a request to another resource on the same server. That resource can be a Servlet, JSP page or a simple HTML page. Information can be passed to the forwarded servlet using an attached query string, or using the request attributes set with the setAttribute() method.
Unlike a sendRedirect() which originates a request from the client, a forward operates entirely within the server, and the client cannot tell that a forward has happened.
In the following servlet code, will perform a search based on some user input, and forwards the request attributes to a display page.
public void doPost(HttpServletRequest req, HttpServletResponse res)
		throws ServletException, IOException {

	. . .

	String search = request.getParameter(“search”);
	String[] searchResults = getSearchResults(search);

	request.setAttribute(“searchResults”, searchResults);


	RequestDispatcher dispatcher =
		request.getRequestDispatcher(view/displayResults);

	dispatcher.forward(request, response);

	. . .

}
Having seen how forward works, now we come to an interesting question:
When do we use forward() and sendRedirect()? in our servlet code:
It is best to use forward() when one component must perform business logic and share the results with another component, like in the case where one servlet must make a search and forward the results to another servlet to display.
sendRedirect() works best when the client should be redirected from one page to another – we generate a new request from the client.
2. The include() method
include(ServletRequest request, ServletResponse response)
Works like a server-side include ( SSI ) and includes the response from the given resource ( Servlet, JSP page, HTML page ) within the caller response.
The response from the servlet is now available to the caller. For example:
public void doPost(HttpServletRequest req, HttpServletResponse res)
throws ServletException, IOException {
	. . .

	RequestDispatcher dispatcher =
			request.getRequestDispatcher(
			“/servlet/getInventoryData?p=6546");

	dispatcher.include(request, response);
	. . .

}
Whatever response that was set by the servlet mapped to /servlet/getInventoryData?p=6546 will now be available within this called servlet. Here too, information can be passed to the called resource using query strings or request attributes set with the setAttribute() method.
Summary:
We saw a brief history of the evolution of web applications and the HTTP protocol. This chapter provided us a firm foundation on the servlet technology.
- Understand how to write servlets – the servlets project structure, and the ANT build scripts
- The web.xml mapping file
- Reading user input and sending response to the browser
- Saving state across invocations
- Servlet Security – Basic, Form-based authentication and Custom Authentication.
- The RequestDispatcher’s forward() and include() method