Learn Java Programming
6.0 Apache ANT – the build tool
The following are the objectives of this module:
- Install Apache ANT
- Write a simple ANT build script
ANT is a popular build tool for the Java Environment:
ANT is platform independent – meaning an ANT build script written for the Windows Operating System, is bound to execute as expected in the Unix/Linux and other operating systems.
As a serious programmer, it is very essential for us to get a firm grasp of this simple and easy to use Build Tool.
Here is what we need to do:
- Download ANT from the apache website – Extract the contents to a local folder. (I have extracted the contents to my C:\apache-ant-1.8.1)
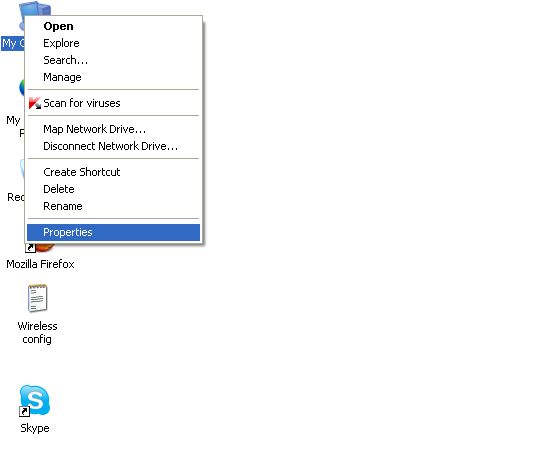
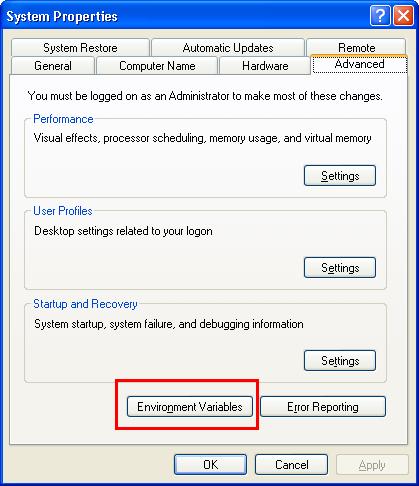
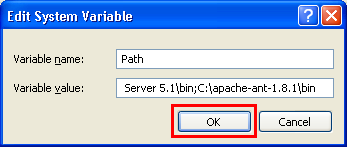
- Add the ANT bin folder to the $PATH environment variable [If you are using Windows – go to MyComputer-> Properties -> Advanced Tab -> Environment variables button. Under SYSTEM variables, find PATH, select and click the Edit button and add the ANT bin directory (for example C:\apache-ant-1.8.1\bin) in the Variable value textbox after appending a semi-colon after the previous entry

- Now the ANT build environment is ready on your computer.
Every project you will be building would need a ANT build file.
It would serve a minute to refresh on the project structure we would need to follow for a typical project:
YourProjectName
	+
	+
	+------ src
	+
	+------ lib
	+
	+------ classes
	+
	+------ dist
	+
	+------ build.xml
All the source files would have to be placed under the src folder.
Any library files needed by the application would be placed under the lib folder
The Java source files would be compiled into the classes folder
And when we are distributing our software, generally as a JAR file, we would be creating the Java-Archive in the dist folder.
Every project would typically have one ANT build file – the build file is generally named as build.xml
An ANT build file is composed of targets – A target is a specific activity or work that you define that need to be executed by ANT
<?xml version="1.0"?>
<project name="My Project" default="compile" basedir=".">

	<property name="src.dir" value="src"/>
	<property name="build.dir" value="build"/>
	<property name="dist.dir" value="dist"/>
	<property name="lib.dir" value="lib"/>

	. . .

	<target name="prepare">
		<mkdir dir="${build.dir}" />
		<mkdir dir="${dist.dir}" />
	</target>

	<target name="clean" description="Remove all generated files">
		<delete dir="${build.dir}" />
		<delete dir="${dist.dir}" />
	</target>

	. . .

</project>
First we define the properties to be used in the build file.
The properties for the ANT build file, can be defined within the build.xml file, or seperately in a build.properties file
If using a build.properties file, then the ANT build file above would look like this:
Filename: build.properties
	src.dir=src
	build.dir=build
	dist.dir=dist
	lib.dir=lib
Filename: build.xml
<?xml version="1.0"?>
<project name="My Project" default="compile" basedir=".">

	<property file="build.properties"/>
	. . .

	<target name="prepare">
		<mkdir dir="${build.dir}" />
		<mkdir dir="${dist.dir}" />
	</target>

	<target name="clean" description="Remove all generated files">
		<delete dir="${build.dir}" />
		<delete dir="${dist.dir}" />
	</target>

	. . .

</project>
Now the values for src.dir, build.dir, dist.dir and lib.dir are fetched from the build.properties file.
The prepare target is used to prepare the Environment for building the project – this basically makes sure the build and dist directories are created.
The clean target is used to clean up all the compiled code and start fresh – typically it deletes the classes and the dist folder.
Setting up the CLASSPATH
Compiling the source code involves setting up the correct CLASSPATH, and also copying the configuration files, the .xml and .properties file to the [classes] destination folder. Here is how we define the CLASSPATH and the file pattern
	<path id="master-classpath">
		<fileset dir="${lib.dir}">
			<include name="*.jar"/>
    			<include name="**/*.xml"/>
    			<include name="**/*.properties"/>
		</fileset>
		<pathelement path="${build.dir}"/>
	</path>

	<patternset id="meta.files">
		<include name="**/*.xml"/>
		<include name="**/*.properties"/>
	</patternset>
The CLASSPATH now includes the jar files in the lib.dir and also the classes being compiled from the src directory to the classes directory.
We also define a patternset for the configuration files to include the .xml and .properties files
Compiling the Source code
The compile target is now give below as:
<target name="compile" description="Compile main source tree java files">

	<mkdir dir="${build.dir}"/>

	<javac destdir="${build.dir}" debug="true"
		deprecation="false" optimize="false"
			failonerror="true">

		<src path="${src.dir}"/>
		<classpath refid="master-classpath"/>

	</javac>

	<!-- Copy over the mapping files -->
	<copy todir="${build.dir}">
		<fileset dir="${src.dir}">
			<patternset refid="meta.files"/>
		</fileset>
	</copy>
</target>
The compile target uses the master-classpath definition and compiles the source files to the destination directory that is given by the value of [build.dir] pointing to classes directory
This target also copies the configuration files if any, defined in the source directory to the classes directory.
Once we have compiled the source files, we then can create a JAR using the target:
<target name="jar" depends="compile"
	description="Builds the Jar file">

	<jar jarfile="${dist.dir}/itseasytolearnjava.jar"
		basedir="${build.dir}" />
</target>
Here is the complete model ANT build file which we will be using without much difference in the coming projects and exercises:
Filename: build.xml
Path: Main project folder
<?xml version="1.0"?>
<project name="My Project" default="compile" basedir=".">
	<property name="src.dir" value="src"/>
	<property name="build.dir" value="build"/>
	<property name="dist.dir" value="dist"/>
	<property name="lib.dir" value="lib"/>


	<path id="master-classpath">
		<fileset dir="${lib.dir}">
			<include name="*.jar"/>
			<include name="**/*.xml"/>
			<include name="**/*.properties"/>
		</fileset>
		<pathelement path="${build.dir}"/>
	</path>

	<patternset id="meta.files">
		<include name="**/*.xml"/>
		<include name="**/*.properties"/>
	</patternset>

	<target name="prepare">
		<mkdir dir="${build.dir}" />
		<mkdir dir="${dist.dir}" />
	</target>

	<target name="clean" description="Remove all generated files">
		<delete dir="${build.dir}" />
		<delete dir="${dist.dir}" />
	</target>


	<target name="compile-only" depends="prepare"
			description="Compiles all the source code">

		<javac srcdir="${src.dir}" destdir="${build.dir}" />

	</target>

	<target name="jar" depends="compile"
				description="Builds the Jar file">

		<jar jarfile="${dist.dir}/itseasytolearnjava.jar"
					basedir="${build.dir}" />
	</target>

	<target name="compile"
			description="Compile main source tree java files">

		<mkdir dir="${build.dir}"/>
		<javac destdir="${build.dir}" debug="true"
			deprecation="false" optimize="false"
				failonerror="true">

			<src path="${src.dir}"/>

			<classpath refid="master-classpath"/>

		</javac>

		<!-- Copy over the mapping files -->
		<copy todir="${build.dir}">
			<fileset dir="${src.dir}">
				<patternset refid="meta.files"/>
			</fileset>
		</copy>
	</target>

	<target name="run" description="Runs a Java class">

		<java classname="Hello" fork="yes">
			<classpath>
				<pathelement
					location=
					"${dist.dir}/itseasytolearnjava.jar"/>
			</classpath>
		</java>

	</target>

</project>
Summary:
ANT is the preferred build tool for build java applications. In this module we saw the following
- Setup the ANT build tool on the development system
- Create a skeleton ANT build.xml file that will be used in our samples and projects